Last Updated on May 16, 2023
There are many reasons for testing an Amplifier Output with a multimeter, as it is one of the most useful gadgets. A multimeter can calculate the electrical current, voltage, and resistance. Apart from the multimeter, there are also so many gadgets that can effectively measure these components. Still, we prefer this gadget because of the irresistible force it brings to the whole outcome.
Why should you test the amplifier output with a multimeter?
A multimeter is like an all-rounder as it can determine many electrical readings that are so useful while conducting any repair work. Here are some inclusive causes behind calculating Amplifier Output:
- The amplifier’s output power has been considered the most influential aspect in the area of calculating the visuals.
- The phase that has been delivered to its load is simply agitating. The output power measurement may distinguish all the things happening inside the broad gaze system.
- You can compare the output energy with the mean level of the simplified amplifying chores.
- It is possible to inject the features that have turned on the tabloids with a reverse headroom of the amplifier. It is also possible to inject the amplifier, which clips inside the chamber of the solenoid.
The complete process of Testing Amplifier Output with a Multimeter
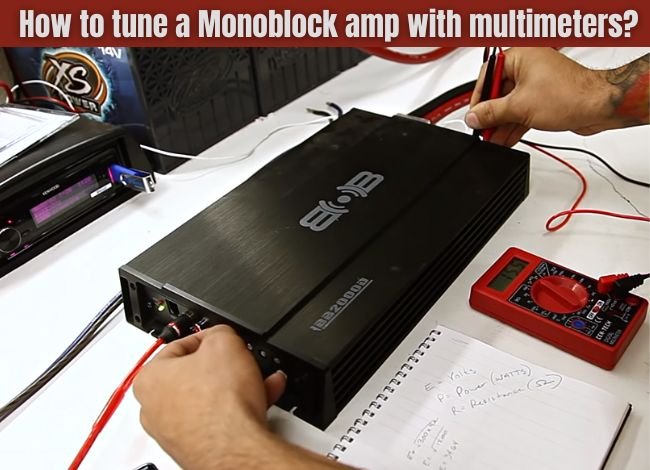
Testing amplifier output with a multimeter isn’t that hard. If you want to do close testing with the multimeter, then get a full-digital multimeter. You need to set the multimeter while calculating the DC voltage. The core theme is to have an engagement with the positive lead to the positive terminal of the device. The opposite side of the terminal must be attached to the negative lead. The positive and negative terminals must have a reading between 11 and 16 volts. If somehow it reads the reading at 0 volts, then there must be something wrong with the system. The core resistance within the amplifier’s terminals may greatly impact the core value’s dissipation.
Now let us have a look into the step-by-step process of calculating the Amplifier Output with a Multimeter.
Phase-1: Check the Highest Readings
First, you need to examine the highest readings with the help of a multimeter. If the multimeter detects a lower voltage than the standard value, the amplifier may fail to work because the internal connections are defective. Turn on the accusative gesture to measure the AC voltage, as the output voltage lies between 10 and 15 volts.
In this stage, search for the tantamount wire. The socket has a large black probe that joins the common socket. The multimeter’s central dial has a large, appropriate setting, which is also claimed with the socket.
Phase-2: Disconnect the speakers
In the next step, you need to disconnect the speakers from the main channel. The amplifier must be detached from the mainstream channel. The output of the amplifier gives a large and emphatic gesture as it comes up with disastrous testing settings. When the speakers are disconnected, it keeps all the information for making large component measurements. If the amplifier is occupied with more than one set of speakers, then keep it an enthralling experience to hold the proceedings.
Phase-3: Check for a blown fuse
In this phase, it is all about the amplifier’s fuse. This plays a crucial role in negotiating the blown fuse. When the voltage reading exceeds the actual range of the amplifier’s fuse, it exceeds the specified range and also requires the removal of amplifier trajectories. Testing this component with a multimeter activates the initial data manipulation technology. After finding out you blew a fuse, you need to replace it before agitating this without an implementation.
Phase-4: Check short circuit
A short circuit is another cause that keeps going in any of the circumstances while measuring it with a multimeter. There is terminology in the case of sorting amplifiers somewhere in the chamber of the opposition of the probes.
After you have checked for a short circuit, it is the utmost measure to intercept the proper management of the amplifier. You need to check the voltage across the inductive positive and negative terminals. When the reading reaches 0 volts, it consumes extra energy before proceeding to the multimeter signal.
Phase-5: Final Readings
In the last phase of the process, you must conduct a proper polarity test of the voltage reading. Another subject to remember is that each of the car amplifiers is made in a way that attaches both the positive and negative terminals. The positive lead makes an impact on the negative side of the multimeter. Some amplifiers need proper insulation and wired phenomena. You need to always check the polarity between voltage readings, which is inspiring to succeed in probe testing. In the end, the proper interpretation is the key to everything going on perfectly with Testing Amplifier Output with a Multimeter.
Common Mistakes While Testing
We have found so many hasty examples of making bad mistakes while testing amplifier output with a multimeter. So we have gathered some common mistakes that you need to avoid while testing amplifier output.
- Most people forget to attach the multimeter leads in a simplified way. In order to get accurate readings, you must connect the red lead with the positive terminal.
- Bad or display error is agitating the multimeter settings. When testing amplifier output, ensure the multimeter is in the correct range. If you get inaccurate readings, always attach the multimeter leads in the correct manner.
- The absence of polarity is so threatening to the output readings. Neglecting amplifier terminals is the worst thing. Sometimes reversed readings can disseminate all the improper casualties.
- Ravaging the impedance mismatch is quite a common error that regenerates the precedence of the amplifier. An impedance mismatch may occur due to the stabilization of the system. The accuracy of the readings is always questioned in case it happens very fast.
- If the DC offset is defective, then it may brutally affect amplifier output accuracy. The readings may neutralize the action pending through the section. It is common to encounter such a defect in interpreting the results.
Final Verdict
A multimeter is a tremendous gadget that can investigate almost all types of electrical gadgets, including amplifier testing. The amplifier output always looks whacky if the multimeter is not of decent quality.
The results are always on top of affecting factors, and the load parameter can change the whole situation. The amplifier and the frequency of the current are severely connected to each other. It is handy to measure the voltage with the help of a multimeter.
If the readings are similar to the recommended watt output, then you have successfully accomplished your goal. By following these guidelines, you can easily get accurate readings of the amplifier.