Last Updated on August 20, 2021
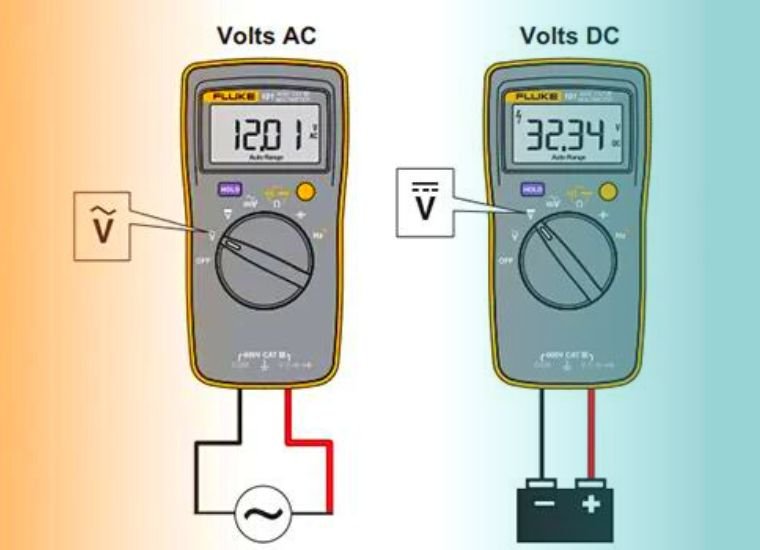
When a person speaks about a multimeter, the first thing that crisscrosses many people is how to measure electricity and then, voltage. If you’re new to multimeters, their lots of questions that usually bother your mind? How will I use the multimeter device? Is it the right tool for my Job? How do I measure ac or dc voltage? I am doing the right thing with the device or should I seek advice? Such queries are common to beginners. We’ve simplified things for you by talking about the steps that a multimeter user should embrace to measure ac voltage correctly with a digital multimeter. If you don’t know what does a multimeter then you should read that post.
Steps to follow include:
Step 1: Select a quality multimeter tool
Since there are all kinds of multimeter devices on the market, ensure that you pick a multimeter that suits your job and has the ideal features. A quality multimeter will give you accurate results compared to a less effective one. For added safety, wear gloves and rubber shoes.
Step 2: Take precaution when using a multimeter
When using a multimeter, make sure that you take necessary precautions to avoid accidents or harm. Here are things to do – never touch the test lead tips, constantly place the test leads in the right positions and lastly, place the regulator in the right position before carrying out any reading.
Step 3: Set the multimeter range
Before placing the probe in the correct position, ensure that you have set the multimeter in the right range. It should be slightly above the value you want to test. The range of volts is written as V- and you should point it at 600.
Step 4: Place the common test lead
Place the black test lead in the common port. Other people refer to it as a common terminal.
Step 5: Connect the Test leads in the right ports
After connecting the common probe, you should now be very cautious in connecting the other probes. When you’re measuring voltage, you should connect the red test lead to the VΩmA. You should not connect the red test lead to 10ADC. If you do so, this will cause havoc t your appliances. So, always be keen and ensure you place the red test lead in the right port.
Step 6: Connect to AC mains
Always inspect the ground and live wire. Connect the black test lead to one of the live wire and the red test lead to another live wire. In case you want to hold the reading, press hold on the digital multimeter device.
Step 7: Remove the test leads
If you have successfully measured or tested ac voltage, you can now disconnect the test leads. Start by removing the red test lead and follow with the black one.
Summary
With the above steps, measuring the ac voltage of a multimeter can be done easily and quickly. It doesn’t matter if you are a beginner or pro in the multimeter field. You can also test car battery following similar process. It is also important to know how to interpret the results that are displayed on the multimeter screen. Hopefully, you’ve found this post to be informative and has helped you in one way or another.


