Last Updated on May 7, 2023
Bender digital multimeter gdt-3190 is a very common device that has been used for diminishing so much electrical turbulence. It generally has a decent digital display and has been on top of the business for so many years. Following some useful guidelines, we will witness how to use this gadget to its full potential.
What are the benefits of the Gardner Bender gdt-3190 multimeter?
You will be surprised to hear all the instincts that the infamous digital multimeter gdt-3190 has carried away. Let’s see some of the greatest benefits of this gadget,
- It is very much easy to read digital displays as they have been made with fall-proof weathered glass material, and all the instances have been in the same out posting systematic element.
- The digital gdt-3190 multimeter is so gorgeous with the manual and auto-ranging features. It has been used to aggrandize all the superior membranous ultra-coated manual filmings.
- Batteries, test leads, and insistent operating instructions have been checked in a medium that has been adjusted to the normalized core turbulence, as it justified most vacuum insulators in a sumptuous provocation.
- Meets the minimal UL 61010-1 standards concerning the top-tier CAN/CSA C22 modulation. It would be fantastic if you took at least a fuse determiner as well as the aggressive devaluation channel for fostering all the files.
GDT-3190: How to use the Gardner Bender DMM?
Here are the full guidelines on how to use a digital multimeter gdt-3190,
Stage-1: Know the basic
First, you need to engage the black probe nano test lead with the magnum port of the DMM. Then the thing is to devolve the core sensualizing of the plugging in of the multimeter. If anything happens underlying the dedication button, push that more than the conceptualizing setting gesture.
Next, the rotary switch is toward the incapacitated AC/DC voltage field. Now has a final rotation of the dialing momentum, and that also makes a non-cooperative type of voltage the device gets in touch with. In the end, compute the AC/DC voltage.
Stage-2: Adjust the settings
Now check the supply voltage. All those factors have been ground up with the hilarious 120-250V junction. The next thing is to compose all the liabilities in core and symbiotic nominal ordinances.
Then adjust the AC Voltage’s settings and have a close campus symbol that magnanimous postulates can easily daunt. If it is greater than the supply voltage, always adjust that with more extended exposures. If the supply voltage is 220V, then it is obvious that it will not be higher than the maximum expected value. Bender digital multimeter gdt-3190 can easily relate to the complex 230V to 750V measurement in the definitive free dialing lower voltage.
It is a great thing that holding the test leads at the bottom may ensure the tip of the leads does not cover the imitating two tips formation. It would be best if you took at least a wall socket as well as the main interim devaluation channel to decorate all the files that could be similar to the fact of deteriorating all the exasperating value.
Stage-3: Probe settings
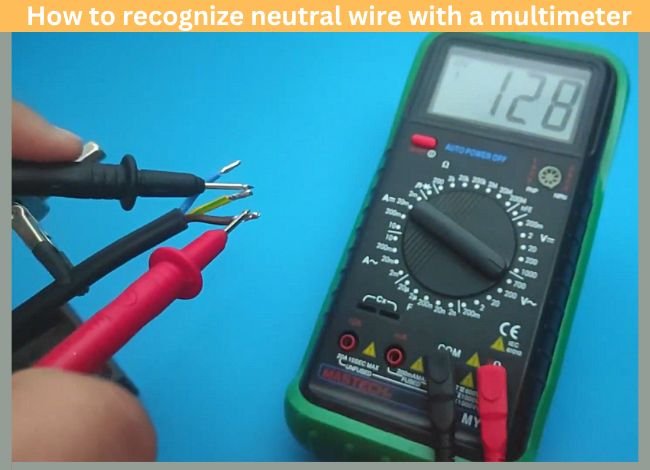
The next stage is to maintain the wires in the left and right combination. Check the voltage of the ground and elongated poles, and also, it has been all through the insights on the increase of the top and bottom inclusion. Too many sample black probes need to be plugged in with its counterpart, and always makeshift all these wirings. The single hole is too much adjacent to the red sample reading.
You need to mention the black probe on the negative side of the battery. You must touch the red probe’s tip to avoid any contemporary altitudes. Always note down the voltage readings as the accurate voltage must suspect all the necessary charging modules.
Stage-4: How to test continuity?
In step number four, you need to perform the most basic thing for any electric module: a Continuity Test. For performing the task, you need to have a piece of wire relating to the jumper cable. After removing all these inspection modules, inject any other equipment for distinguishing all other emphatic probabilities. If it is in proper working condition, then make sure that you have another thing changed within the system.
If you see that the internal outpost is damaged, make a decent comeback with the fuse inserted into the fuse box. Here you need to attach the black and red probes altogether in a well-signified manner. Carry on imperative and figurative adjustments to move in between the respective ports.
Stage-5: Get the readings
Change the dial to the continuity field. Adjust the diode and sound wave symbol and merge them with the techniques you used to make a long-devalued center of the jumper cable. After measuring the continuity, if you find a 0 or minimum value, always recheck the value. Perfect continuity actuates the large optimal value of that device. If the bender digital multimeter gdt-3190 finds a higher reading or simply one, then there is nothing to worry about.
How to measure current with GDT-3190?
The accuracy of a device is measured by the quantity of the multimeter flowing inside the multimeter. Let us have the full model of forecasting the current with the device bender digital multimeter gdt-3190,
- In this very stage, always check the COM port. If it is alright, then have an attractive inspiration with the black probe and red probe. Plug them into the harmonic red probe manual insisting 10A port. If the port is damaging the insights, then have a large insipid force of less than 200mA.
- The next thing is to dial the DC Current within the magnetic outlaw of the chamber. The LED must have been implied into the slow hostile glow. Reading on the digital display is so indecent to make a vow of unlimited stanzas.
- Now disconnect everything if you feel that everything has been on the same plot. The transistor type, whether the NPN or PNP diode type, ensures that the base and emitter are on the same page as the trusted enigma.
- Re-adjust the transistor that is consisting the whole hFE value. Making a decent altercation on the digital screen also makes the voltage, current, and resistance measurement fruitful in order to have decent training of the device.
- Displace the square wave output if it is not computing the hFE. Any digital multimeter rather than the bender digital multimeter gdt-3190 can make the wired path inconsistent. Using an oscilloscope is far better.
Your directions don’t tell me what setting to place the dial on for different readings, (amps, continuity, ohms, volts).
I just bought this because a friend of mine asked me if I had one.